So, this tent decision has been a long time in the making. Made more difficult by the fact that I had an awesome tent in the first place. My MSR Mutha Hubba HP is a built like the proverbial. But at 3kg, it was the main sticking point in my lightweight kit. Dividing it between three is doable, dividing it by two or taking it on my own is manageable (not ideal) weight wise, but volume wise just doesn't work with my transition to a much smaller pack.
So, enter TT SS2.
This gear review will be in two parts: initial comments, then a longer term review
Reasoning
The decision to choose the TT SS2 over other shelters came down to a few things:
1. My wife and I use 1 walking pole each, solo I can use one of the strong TT poles
2. Needs to be comfortable and spacious for two, and fit three in an emergency
3. Dual vestibules
4. Dual wall
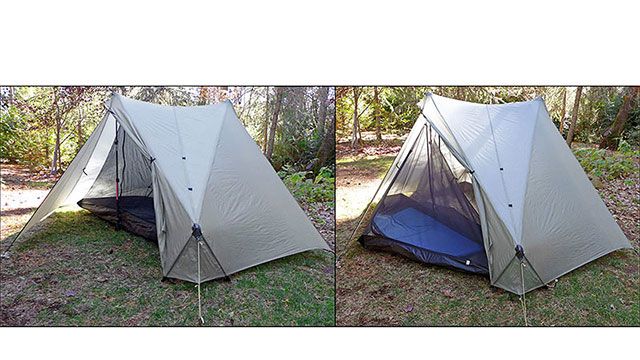
5. Option of both a mesh (for use in SA) and solid inner (for use in Tas)
6. Small packed size (it really is small when packed up)
7. Lightweight
I'd read conflicting views on the robustness of the SS1/SS2, particularly in strong wind, so I've kept the MSR for now – however that's a pretty big dome tent, so it probably wouldn't be the most bombproof tent in really exposed locations anyway.
Ordering
The ordering process was pretty easy. I ordered both inners, one pole, two 10' lengths of guy line, Tyvek ground sheet, two pole adapters, seam seal kit and requested the free repair kit in the comments section of the ordering page. All up came to about AUD$800 with a conversion rate of 76c. The Stratospire 2 was not listed as in stock, so I expected a wait time.
But within a day I received an email asking me to confirm I only wanted one pole (great customer service). Within two days of ordering, the tent was dispatched! It arrived in about 6 business days which is very good for USPS. Very well packed and protected, bravo TT!
Everything arrived exactly as ordered. The solid inner was clipped into the tent, while the mesh inner came with it's own separate sack. Weigh in showed 1419g with solid inner, which would equate to about 1330 with the mesh. Another 120g or so for the Easton pole if I hike solo.
Repair Kit
This came with an assortment of mesh, bathtub floor, and silnylon fly materials wrapped in a small bundle – included for free if you request it, and no doubt useful down the track.
Pole Adapters
The tyvek is wide enough to cover the ground where my hiking pole goes, so I don't see the handle getting damaged – and without the footprint, it's not that hard to clear an area for the hiking pole to sit. I also imagine the shelter would be less robust with the pole up the other way because it might be able to move around a bit in the spire. I'll be using the walking pole tip up. Anyone want two pole handle adapters?? Don't really see the point.
Tyvek Groundsheet
The Tyvek groundsheet seems great – I've never seen Tyvek before. It feels very much like thick paper, but I think for it's weight, is a cheap and effective solution to protecting the bottom of the tent. It seems slightly oversized compared to the bathtub floor, which may be intentional on TT's behalf because apparently the first time you wash Tyvek it can shrink a little. Either way, it's good to have a bit extra because it means my hiking pole handles are not in the dirt.
Pole
The included pole is the stronger one available from Tarptent. A lot of online comments indicated the "substitue" lightweight poles were a waste of time. The pole seems quite strong, although perhaps not as much as a hiking pole. The hiking pole is generally easier to setup too, because you can fiddle with the height to get the tensioning right. It will do the job when I'm walking solo.
Seam Sealing
In hindsight, I wouldn't bother with the kit for several reasons. With two kids, a trip to the hardware store is a half day outing, so I took the easy option and bought the kit. I didn't realise, but the mixture they send is premixed with low-odour mineral turps (flammable), which technically (unless I've missed an obvious difference with US dangerous goods legislation) makes this illegal to ship by air without declaring and shipping as a dangerous good. I'll be following this up with Henry, because it should not be posted like this. The premix appeared to have either not been made runny enough or partially dried out already (although bottle was well sealed), and had very thick consistency which made it hard to use – not dissimilar to pure silicon. Also, because you have to tip it into another, bigger container that fits the brush head, it dries out quickly and skins. Within 10 minutes or so the mixture becomes unusable unless you keep adding a your own mineral turps to keep the consistency – which of course means you need supplies beyond what is in the kit and makes the whole idea redundant. I did two entire seals of all the seams, but the second one was a heap better because I mixed the “premix” with turps to thin it out a little and this made it much easier to use. The paper towel method for wiping off excess worked a treat, and prevents discolouration of the fabric. Overall, the seam sealing takes getting used to and is a little time consuming – the seam seal kit is a waste IMHO. Better off buying your own equipment so you can maintain the correct fluid consistency as you go. I also seam sealed the four stitched corners of each bathtub floor. Unfortunately I had standard (not low odour) turps at home, so was a bit stinky for a few hours until it all evaporated. I didn't bother hosing it down to check waterproofing, hopefully I got it right.
Pitching
I set it up in the backyard, and agree with the general consensus online that it can take a while to get a good pitch. Having to move each peg to reposition is an obvious disadvantage of the non-free standing tent, so hopefully I'll get it right next time so I don't have to move anything. My main issue here was the pitch lock corners are easy to over tension if you set it up randomly or using Franco's method. You actually need the most tension between the two spires, so in my most humble of opinions, Henry's method is better and will allow me to get the pegs in the right spot first time. My first pitch had a big crease on the bathtub floor between the pitch lock corners, so I repegged these closer in and then moved the door pegs out to reshape the whole thing.
Guy Outs
You really can't set this tent up properly without guying out the spires. Even by juggling the peg points and pulling the door out fairly taught, without the assistance of the guyline pulling the spires apart – the tent fly doesn't sit clear of the inner, which would be a disaster with any condensation. As soon as I had reset the pitch lock corners closer to each other, and then guyed the spires out to some additional peg points – the inner sat well clear of the fly, I had a reasonably taught pitch and the bathtub floor no longer had a crease between the pitchlock corners.
Pegs
Which brings me to another issue – the tent is provided with six pegs, and it's simply not enough. If you could roughly get it pitched well enough for reasonable weather I'd be forgiving, but the reality is you just can't get the tent inner off the fly without guying out the spires. So for even fine weather, this tent really requires a minimum of 8 pegs. For strong winds, you'd be looking for at least 10 pegs so that each spire could be double guyed out, or so you could add extra guy out on the provided black loops on the into wind side. I know I'll cop criticism for this – TT's argument will be that some people would complain about 8 pegs being standard when they can use their own, and I know it'll add another 25g or so to the weight which might cost them sales – but the reality is, the tent is not really a 6 peg tent in any sense of the word or even fair weather conditions. I understand TT's reasoning here and the fact that they are damned if they do, and damned if they don't. I'll be adding 2-4 MSR Groundhogs to my kit to make it all weather capable, and I'll be installing longer guys on the spires – the provided ones aren't nowhere near long enough to give any sort of angle away from the tent, so they'll pull pegs out too easily. I'll also carry some extra lengths of guyout for extra protection in bad weather.
For really bad weather or camping on any windy, exposed ridges – I'll be swapping ALL of the Easton pegs out for 12 Groundhogs. The better sideways strength of the Groundhogs make it a much better suited peg for this tent. The longer guys with a flatter angle to the ground will also make the pegs more likely to stay put.
Finish Quality
The stitching quality is excellent. The fabrics are high quality, and the mesh is by far the finest I've seen – which allows for completely unimpeded views outside. Even the storage sack has excellent quality stitching, at least equal to my MSR which is saying something. The only aesthetic faults I could find were
1. the mesh had a couple of little darker patches where it had maybe been pulled or scraped on something, but it massaged back to normal (I read somewhere else Henry had emailed someone how to do this to fix it)
2. the stitching on the spire guyout points is a bit rudimentary and ugly (but obviously has to be very strong)
3. on one seam of the fly there was a tiny crease stitched in
I only noticed these things because I had to seam seal the thing inch by inch – otherwise I would never have noticed them. And they are a complete non-issue from a tent performance point of view. The build quality overall is simply outstanding. Cottage manufacturers continue to impress me with how well presented their products are.
Vestibules
The MSR had dual vestibules and they were big, but presented me with two problems – firstly, they were staked out at quite a low angle, which meant you had to climb out of the tent inner and duck down right into the vestibule to reach the zip to open the vestibule door, and secondly, there were at the each end of the tent rather than the sides, which necessitated climbing over pillows and sleeping gear to get in and out. The side vestibules are an absolute delight. Heaps of space, and you can sit up in bed to open the inner zip and also reach the door zip without getting out of your sleeping bag. Love this – massive plus for me.
Interior
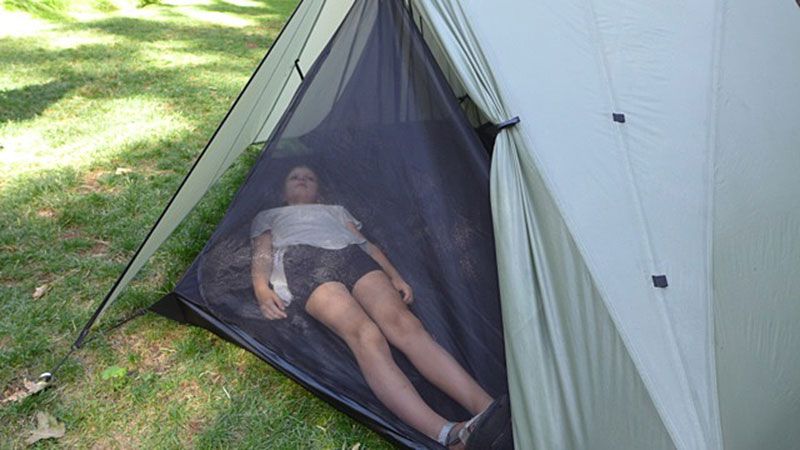
Space – huge. This is big and comfy for two. I'm 6' tall, and there's oodles of space at either end. I can easily sit up from a sleeping position without touching the fly. While it's obviously not as big or wide as the 3P Mutha Hubba, it feels at least as big because the spires give it vertical walls on each side, rather than a dome roof which wraps around and reduces head room near the walls. Fitting three would be a contingency plan only.
Mesh inner is great, awesome all round visibility. I'll be using this inner when it's not too cold and there's views to be had. Solid inner has two small triangles of mesh, the rest (including the roof of the inner) is solid for good water protection from condensation.
Keeping the inner dry during setup/packup – huge advantage. Removing the inner is a great option, but the clips are clumsy to reach and really stiff to get undone unless you have superman strength fingers. They don't need to be so stiff, it's not like they need to have any structural strength – and the elastic keeps tension on them at all times. Perhaps they'll loosen up with use. I'll try Franco's “hold the D loop and twist” method next time.
Weather (Wind) Resistance
I'll obviously talk about this more in the long term review, however I don't see why this thing will be any less weather worthy than the MSR. In fact, it'll probably be better. I think some of the negative comments I've read online about wind shedding are probably the result of two things:
- this thing needs to be guyed out properly. In strong wind, it would need at least two longer guys from each spire (the most important point on the tent to guy out), plus potentially an additional guyout/load lifter on the into wind pitch lock corner
- by its very nature as a non-freestanding tent, this thing places a lot more load on pegs, so you MUST have good pegs.
Because the walls are quite steep, it places more vertical load on pegs, so they will pull out easily. Adding guyouts which are longer is a must in bad weather. The included pegs are really only fair weather. If you try and take this tent into strong winds with the standard guys, the included pegs will pull straight out. This is not a limitation of the tent's strength or weather worthiness, it's simply common sense that this tent gains all its strength from the ground anchors and they need to be robust and spaced further away so they are pulled more sideways rather than vertically. If you were to guy it out carefully and use cup hooks into a timber tent platform (instead of pegs into the ground), I can't ever imagine this tent failing. It's immensely strong. If people want a bomb proof pyramid (non free standing tent), then they need to accept the key to the strength lies in the pegs. I saw some PCT hikers placing rocks on pegs to prevent them pulling out – that's a good indicator that they need better pegs, not that the tent is weak. I've also seen a video of Franco trying to set this thing up freestanding using weights like rocks and water bags to hold the peg points. Don't waste your time, it's just not feasible as anything other than a useful backyard experiment. I wouldn't set this tent up on a hard surface with rocks instead of pegs, in even the most mild of conditions. I tried it in my garage using 6x 10L tins of paint, and it wasn't even taught enough to seam seal.
Summary
All in all, I'm chuffed. It's a fantastic design, lightweight, excellent materials, strong and great finish quality. So far, I'd definitely recommend this tent based on what I've seen.
I have a few trips planned in the next 8 months (one or two nights close to home, plus an Overland Track) so I'll update the thread when I've used it more in the field.
Tarptent Stratospire 2
Forum rules
Forum rules
This is a place to share fair and systematic reviews of gear. Share the good, bad and ugly as well as including how you tested it and reviewed the gear. This is not the place to carry on about a bit of gear that failed, sometimes good gear has a lemon - this is more about systematic reviews. Although this can be a way to help gear manufactures with feedback, this is not the place to hassle them or ask for money back.
Start each thread with
[tag]Brand, product, RRP in AUD. The tags have two parts the type of gear and type of testing/review. eg
[Sleeping bag | Unboxing] Kmart Summit Hooded $29
[Stove | Field test]Jetboil, flash $150
Suggested review types. Unboxing, field test, 1 year on, stress test, teardown.
If someone else has already reviewed the same product in a similar method then please use the initial thread to include your review. Please note if the gear was provide to you for free, loan, discount or if you paid full RRP.
32 posts
• Page 1 of 2 • 1, 2
Tarptent Stratospire 2
![]() by South_Aussie_Hiker » Wed 27 Apr, 2016 3:47 pm
by South_Aussie_Hiker » Wed 27 Apr, 2016 3:47 pm
-

South_Aussie_Hiker - Phyllocladus aspleniifolius

- Posts: 930
- Joined: Tue 22 Feb, 2011 9:24 pm
- Region: South Australia
- Gender: Male
Re: Tarptent Stratospire 2
![]() by South_Aussie_Hiker » Wed 27 Apr, 2016 3:48 pm
by South_Aussie_Hiker » Wed 27 Apr, 2016 3:48 pm
Reserved for future use...
-
South_Aussie_Hiker - Phyllocladus aspleniifolius
- Posts: 930
- Joined: Tue 22 Feb, 2011 9:24 pm
- Region: South Australia
- Gender: Male
Re: Tarptent Stratospire 2
![]() by South_Aussie_Hiker » Wed 27 Apr, 2016 3:48 pm
by South_Aussie_Hiker » Wed 27 Apr, 2016 3:48 pm
Reserved for even more future use...
-
South_Aussie_Hiker - Phyllocladus aspleniifolius
- Posts: 930
- Joined: Tue 22 Feb, 2011 9:24 pm
- Region: South Australia
- Gender: Male
Re: Tarptent Stratospire 2
![]() by GPSGuided » Wed 27 Apr, 2016 4:23 pm
by GPSGuided » Wed 27 Apr, 2016 4:23 pm
Cool! Just don't forget or damage the hiking poles from this point forward. 
Just move it!
-

GPSGuided - Lagarostrobos franklinii

- Posts: 6968
- Joined: Mon 13 May, 2013 2:37 pm
- Location: Sydney
- Region: New South Wales
Re: Tarptent Stratospire 2
![]() by South_Aussie_Hiker » Wed 27 Apr, 2016 7:49 pm
by South_Aussie_Hiker » Wed 27 Apr, 2016 7:49 pm
I haven't broken one yet. As long as you're not silly enough to use them on duck boarding and get them stuck, I can't imagine how you'd snap one.
A thick stick would be fairly easily used as a substitute with a broken pole, unless in a very barren environment.
A thick stick would be fairly easily used as a substitute with a broken pole, unless in a very barren environment.
-
South_Aussie_Hiker - Phyllocladus aspleniifolius
- Posts: 930
- Joined: Tue 22 Feb, 2011 9:24 pm
- Region: South Australia
- Gender: Male
Re: Tarptent Stratospire 2
![]() by GPSGuided » Wed 27 Apr, 2016 8:02 pm
by GPSGuided » Wed 27 Apr, 2016 8:02 pm
My son broke the pole I bought for him 10 mins off the ferry at Narcissus. I got so annoyed. Left a shadow in me.
So, where are you going to take it for the first camp?
Sent from my iPad using Tapatalk
So, where are you going to take it for the first camp?
Sent from my iPad using Tapatalk
Just move it!
-
GPSGuided - Lagarostrobos franklinii
- Posts: 6968
- Joined: Mon 13 May, 2013 2:37 pm
- Location: Sydney
- Region: New South Wales
Re: Tarptent Stratospire 2
![]() by South_Aussie_Hiker » Wed 27 Apr, 2016 9:45 pm
by South_Aussie_Hiker » Wed 27 Apr, 2016 9:45 pm
Hmmmm.... The only time I've gone close was when I couldn't be bothered stowing it, and it got caught between slats on boardwalk. Since then I'm always diligent stowing it on the chest straps of my pack. I've leaned my way across the sodden Loddons and didn't have any trouble. Carbon poles are much stronger and lighter, but I expect they don't bend - they will shatter.
First overnight might be some stealth camping in the Adelaide area, or an overnight on either Deep Creek Conservation park or Mambray Creek/Mount Remarkable.
First overnight might be some stealth camping in the Adelaide area, or an overnight on either Deep Creek Conservation park or Mambray Creek/Mount Remarkable.
-
South_Aussie_Hiker - Phyllocladus aspleniifolius
- Posts: 930
- Joined: Tue 22 Feb, 2011 9:24 pm
- Region: South Australia
- Gender: Male
Re: Tarptent Stratospire 2
![]() by GPSGuided » Wed 27 Apr, 2016 10:30 pm
by GPSGuided » Wed 27 Apr, 2016 10:30 pm
Excellent! Keep us posted of your experience, particularly how it compares to your detailed analysis.
My other problem with the poles is that my poles are of fixed length when in use. Otherwise, CF can actually take quite a bit of flex. It obviously will split and shatter if taken to the extreme. Don't under-estimate the quality ones.
My other problem with the poles is that my poles are of fixed length when in use. Otherwise, CF can actually take quite a bit of flex. It obviously will split and shatter if taken to the extreme. Don't under-estimate the quality ones.
Just move it!
-
GPSGuided - Lagarostrobos franklinii
- Posts: 6968
- Joined: Mon 13 May, 2013 2:37 pm
- Location: Sydney
- Region: New South Wales
Re: Tarptent Stratospire 2
![]() by neilmny » Thu 28 Apr, 2016 6:20 am
by neilmny » Thu 28 Apr, 2016 6:20 am
South_Aussie_Hiker wrote:Reserved for future use...
Hi SAH, editing these post is only available for a short time. Can't remember how long though........
-

neilmny - Lagarostrobos franklinii
- Posts: 2604
- Joined: Fri 03 Aug, 2012 11:19 am
- Region: Victoria
- Gender: Male
Re: Tarptent Stratospire 2
![]() by Mark F » Thu 28 Apr, 2016 8:48 am
by Mark F » Thu 28 Apr, 2016 8:48 am
I notice you mention using the walking pole grip down. When you do this it can become a delicious salt lick for possums. I have had my tent collapsed when a possum decided to take my pole home. When I recovered it in the morning 15 metres from the tent (I couldn't find it at night) the handle was well chewed. Always pole grip up if possible.
"Perfection is attained not when there is nothing more to add, but when there is nothing more to remove".
-

Mark F - Lagarostrobos franklinii
- Posts: 2332
- Joined: Mon 19 Sep, 2011 8:14 pm
- Region: Australian Capital Territory
- Gender: Male
Re: Tarptent Stratospire 2
![]() by South_Aussie_Hiker » Thu 28 Apr, 2016 12:31 pm
by South_Aussie_Hiker » Thu 28 Apr, 2016 12:31 pm
Thanks Neil, I didn't realise there was a time limit.
Didn't think about the possums. A bit of cayenne pepper should sort that out. It's probably better they pull the tent down than climb up the fly or inner to reach the handle at the top!
Didn't think about the possums. A bit of cayenne pepper should sort that out. It's probably better they pull the tent down than climb up the fly or inner to reach the handle at the top!
-
South_Aussie_Hiker - Phyllocladus aspleniifolius
- Posts: 930
- Joined: Tue 22 Feb, 2011 9:24 pm
- Region: South Australia
- Gender: Male
Re: Tarptent Stratospire 2
![]() by DanShell » Thu 28 Apr, 2016 12:37 pm
by DanShell » Thu 28 Apr, 2016 12:37 pm
Great write up on a fantastic tent. The only thing I can add is that I replaced my guy out lines with a thicker (3mm i think) line so they don't slip on a really windy night.
Also, I have pitched both a SS1 and SS2 in places where possums are a known problem handle side down and I have never had one attempt to chew the handle. Im not in any way suggesting that it doesn't happen, it just hasn't happened to me. I have also pitched them in places where a normal sane person wouldn't and also had no animal issues in regards to the hiking pole handles if that makes a difference.
Also, I have pitched both a SS1 and SS2 in places where possums are a known problem handle side down and I have never had one attempt to chew the handle. Im not in any way suggesting that it doesn't happen, it just hasn't happened to me. I have also pitched them in places where a normal sane person wouldn't and also had no animal issues in regards to the hiking pole handles if that makes a difference.
-

DanShell - Athrotaxis selaginoides

- Posts: 1261
- Joined: Mon 18 Mar, 2013 11:23 am
- Location: Central
- Region: Tasmania
- Gender: Male
Re: Tarptent Stratospire 2
![]() by kitty » Mon 02 May, 2016 2:24 pm
by kitty » Mon 02 May, 2016 2:24 pm
Nice write up! I thought I was the only one who struggled with the stiffness of those little clips, especially with cold hands. I added the Nite-Ize SBiner to the clips.
- Attachments
-
- kitty
- Athrotaxis cupressoides

- Posts: 283
- Joined: Thu 20 Mar, 2014 8:04 am
- Region: Western Australia
- Gender: Female
Re: Tarptent Stratospire 2
![]() by Franco » Thu 05 May, 2016 1:46 pm
by Franco » Thu 05 May, 2016 1:46 pm
I posted a video sometime ago on how to handle those mitten hooks :
https://www.youtube.com/watch?v=_dsBgiBAjyk
https://www.youtube.com/watch?v=_dsBgiBAjyk
- Franco
- Lagarostrobos franklinii
- Posts: 2958
- Joined: Thu 30 Oct, 2008 6:48 pm
- Region: Victoria
- Gender: Male
Re: Tarptent Stratospire 2
![]() by Drew » Sat 10 Sep, 2016 5:47 pm
by Drew » Sat 10 Sep, 2016 5:47 pm
Just wondering what the weight of the Stratospire 2 inner is? Or alternatively, what's the fly only packed weight? Doesn't seem to say on the specs.
- Drew
- Phyllocladus aspleniifolius
- Posts: 777
- Joined: Fri 13 Jan, 2012 11:16 am
- Region: Victoria
- Gender: Male
Re: Tarptent Stratospire 2
![]() by Franco » Mon 12 Sep, 2016 1:56 pm
by Franco » Mon 12 Sep, 2016 1:56 pm
The official fly only weight is 700g, under Extras 3rd page.
Add to that pegs and stuff sack.
The 1300g weight for the SS2 with mesh inner includes 6 pegs and stuff sack. (works better with 8 pegs...)
My own fly is a bit lighter (early model) and the weight does go up and down a bit (30-50 g) depending on the fabric on hand.
Add to that pegs and stuff sack.
The 1300g weight for the SS2 with mesh inner includes 6 pegs and stuff sack. (works better with 8 pegs...)
My own fly is a bit lighter (early model) and the weight does go up and down a bit (30-50 g) depending on the fabric on hand.
- Franco
- Lagarostrobos franklinii
- Posts: 2958
- Joined: Thu 30 Oct, 2008 6:48 pm
- Region: Victoria
- Gender: Male
- Drew
- Phyllocladus aspleniifolius
- Posts: 777
- Joined: Fri 13 Jan, 2012 11:16 am
- Region: Victoria
- Gender: Male
Re: Tarptent Stratospire 2
![]() by jrisles » Wed 28 Sep, 2016 11:59 am
by jrisles » Wed 28 Sep, 2016 11:59 am
Rather than start up a new thread on the SS2 I hope that no one minds if i chime in on this one?
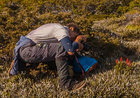
I have recently received my SS2 and took it out on its first run recently to Mapleton National Park for a weekend (2night) jaunt. The weather was pretty good but it did rain consistently on Sunday beginning pretty early and not letting up until late in the day. It certainly wasn't blustery just a nice consistent light rain - which was great for walking.
Whilst i didn't really take any pics whilst on the walk i have just erected the tent at home for an airing because i had to pack it up wet on the Sunday morning. Below are the pics of my SS2 airing out. I am about to go on another walk with this tent in a couple of weekends time - this time to do the Conondale Great Walk over a weekend. As you can see from the pics i have got the "Solid" inner fitted. I bought the tent with both types of inners - Solid and Mesh.
I will also be taking this tent down to the Western Arthurs with me at the end of the year. I should be sitting on some peak in the WA's on Christmas Day
- jrisles
- Nothofagus gunnii

- Posts: 15
- Joined: Thu 08 May, 2014 10:43 am
- Region: Queensland
- Gender: Male
Re: Tarptent Stratospire 2
![]() by johnrs » Thu 29 Sep, 2016 1:37 pm
by johnrs » Thu 29 Sep, 2016 1:37 pm
Hi JRI
Cup hooks are one option on the WA tent platforms.
Will be interested in your trip report
John
Cup hooks are one option on the WA tent platforms.
Will be interested in your trip report
John
- johnrs
- Phyllocladus aspleniifolius
- Posts: 621
- Joined: Mon 09 Aug, 2010 6:09 pm
- Region: New South Wales
Re: Tarptent Stratospire 2
![]() by north-north-west » Thu 29 Sep, 2016 2:33 pm
by north-north-west » Thu 29 Sep, 2016 2:33 pm
You don't need hooks for the WArthurs platforms. They have protruding nails at regular intervals on the sides of the planks. It's easy to snag the guys on them. Makes pitching the tent very simple (except on the short platforms at Haven, if you have something the length of my Nallo . . .  )
)
"Mit der Dummheit kämpfen Götter selbst vergebens."
-
north-north-west - Lagarostrobos franklinii
- Posts: 15148
- Joined: Thu 14 May, 2009 7:36 pm
- Location: The Asylum
- ASSOCIATED ORGANISATIONS: Social Misfits Anonymous
- Region: Tasmania
Re: Tarptent Stratospire 2
![]() by South_Aussie_Hiker » Thu 29 Sep, 2016 9:11 pm
by South_Aussie_Hiker » Thu 29 Sep, 2016 9:11 pm
Hi jrisles 
Absolutely no problem tacking your experiences into this thread - that's what it's for!
In fact, due to a myriad of circumstances I've been unable to get out in the SS2 since the original post.
Many on bw.com have cautioned people in the last against taking a tarptent on the Arthurs - even in summer.
As indicated in the original thread, I think the SS2's strength relies on ground anchors - and using tent platforms for this purpose would be perfect.
I'll be interested to see how it goes for you, and whether it's worthy of the conditions in the WAs.
-
South_Aussie_Hiker - Phyllocladus aspleniifolius
- Posts: 930
- Joined: Tue 22 Feb, 2011 9:24 pm
- Region: South Australia
- Gender: Male
Re: Tarptent Stratospire 2
![]() by Franco » Tue 18 Oct, 2016 8:08 am
by Franco » Tue 18 Oct, 2016 8:08 am
Not sure yet when it will be announced but there will be out soon an add on to the SS 1 and 2.
Stay tuned...
Stay tuned...
- Franco
- Lagarostrobos franklinii
- Posts: 2958
- Joined: Thu 30 Oct, 2008 6:48 pm
- Region: Victoria
- Gender: Male
Re: Tarptent Stratospire 2
![]() by South_Aussie_Hiker » Wed 02 Nov, 2016 7:30 pm
by South_Aussie_Hiker » Wed 02 Nov, 2016 7:30 pm
Well after the busiest six months of my life, looks like I might finally get to take the stratospire out on a trip.
Have setup a few times in the backyard to take the 3&5 year olds "camping", and the pitching has been fairly easy. Using the footprint as a guide, and ensuring the pitch lock corners are not overtensioned (particularly the lower line lock) means I can get a pretty good pitch straight up.
It's definitely a shelter that takes a bit of trial and error to get your head around. I'll update the thread when I take it out on the first real trip.
Any further news Franco?
-
South_Aussie_Hiker - Phyllocladus aspleniifolius
- Posts: 930
- Joined: Tue 22 Feb, 2011 9:24 pm
- Region: South Australia
- Gender: Male
Re: Tarptent Stratospire 2
![]() by Franco » Sat 05 Nov, 2016 6:43 am
by Franco » Sat 05 Nov, 2016 6:43 am
Not yet but we should make it official by the end of the year.
- Franco
- Lagarostrobos franklinii
- Posts: 2958
- Joined: Thu 30 Oct, 2008 6:48 pm
- Region: Victoria
- Gender: Male
Re: Tarptent Stratospire 2
![]() by Franco » Sat 03 Dec, 2016 9:18 am
by Franco » Sat 03 Dec, 2016 9:18 am
Official now.
This is the SideCar, a bug net that fits inside a vestibule of the SS 1 or 2.
For a child or a dog :
further details here :
https://www.tarptent.com/whatsnew.html
details on a new shelter there. Another one (maybe two) to come soon.
This is the SideCar, a bug net that fits inside a vestibule of the SS 1 or 2.
For a child or a dog :


further details here :
https://www.tarptent.com/whatsnew.html
details on a new shelter there. Another one (maybe two) to come soon.
- Franco
- Lagarostrobos franklinii
- Posts: 2958
- Joined: Thu 30 Oct, 2008 6:48 pm
- Region: Victoria
- Gender: Male
Re: Tarptent Stratospire 2
![]() by simonm » Sat 03 Dec, 2016 1:47 pm
by simonm » Sat 03 Dec, 2016 1:47 pm
That is clever Franco - I like that.
- simonm
- Athrotaxis selaginoides
- Posts: 1401
- Joined: Tue 30 Apr, 2013 4:40 pm
- ASSOCIATED ORGANISATIONS: Tier Gear Tasmania
- Region: Tasmania
Re: Tarptent Stratospire 2
![]() by Franco » Sat 03 Dec, 2016 4:44 pm
by Franco » Sat 03 Dec, 2016 4:44 pm
Henry has a dog however he keeps it inside the tent but he knows many prefer a separate space except that dogs tend to escape from vestibules.
(of course not every dog will see a mesh wall as a barrier)
We have another shelter coming out (kind of a two person Notch) that I think is very clever as well as another two or three that will be slotted in later on.
(of course not every dog will see a mesh wall as a barrier)
We have another shelter coming out (kind of a two person Notch) that I think is very clever as well as another two or three that will be slotted in later on.
- Franco
- Lagarostrobos franklinii
- Posts: 2958
- Joined: Thu 30 Oct, 2008 6:48 pm
- Region: Victoria
- Gender: Male
Re: Tarptent Stratospire 2
![]() by Drew » Thu 05 Jan, 2017 3:04 pm
by Drew » Thu 05 Jan, 2017 3:04 pm
EDIT - I'm moving this post to the main Equipment section - the Gear Reviews section doesn't see much traffic!
- Drew
- Phyllocladus aspleniifolius
- Posts: 777
- Joined: Fri 13 Jan, 2012 11:16 am
- Region: Victoria
- Gender: Male
Re: Tarptent Stratospire 2
![]() by Drew » Sat 18 Mar, 2017 1:12 pm
by Drew » Sat 18 Mar, 2017 1:12 pm
I will also be taking this tent down to the Western Arthurs with me at the end of the year. I should be sitting on some peak in the WA's on Christmas Day
I'm sure I'm not the only one curious to know how the Stratrospire handled the Western Arthurs. Any chance of a trip report jrisles?
- Drew
- Phyllocladus aspleniifolius
- Posts: 777
- Joined: Fri 13 Jan, 2012 11:16 am
- Region: Victoria
- Gender: Male
Re: Tarptent Stratospire 2
![]() by Suz » Fri 31 Mar, 2017 8:09 am
by Suz » Fri 31 Mar, 2017 8:09 am
I have an SS1 which I'm pretty happy with...severe winds were not so great, but otherwise it's been excellent. I probably need to modify it a little for extra wind protection.
I would like to say tho that it also appears to be able to put up with having smaller animals walk over the top of it while erected! Woke up on Maria Island the other day with footprints leading right up over the tent and down the other side. Think it might have been the juvenile tassie devil that was hanging about - probably weighed about 1kg. I was quite surprised!
I would like to say tho that it also appears to be able to put up with having smaller animals walk over the top of it while erected! Woke up on Maria Island the other day with footprints leading right up over the tent and down the other side. Think it might have been the juvenile tassie devil that was hanging about - probably weighed about 1kg. I was quite surprised!
- Suz
- Athrotaxis cupressoides
- Posts: 440
- Joined: Fri 03 Apr, 2015 7:58 am
- Region: Western Australia
- Gender: Female
32 posts
• Page 1 of 2 • 1, 2
Who is online
Users browsing this forum: No registered users and 14 guests