Time to reveal who did what... And what they did.
Well, somewhat overdue, sorry 'bout that. I went walking for a couple of weeks, now I have just finished a very busy 6 days at work.
I hope everyone doesn't mind, I pretty much copied and pasted the comments and info straight from the emails.
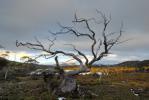
Congratulations to Samh!01 - samhSo here is my edited image, I'm a bit of a beginner, and I haven't spent a lot of time on doing that one.
What have I done:
First adjust whitebalance and contrast than convert to TIFF Next I multiplied the image to get tow layers with the top layer blending mode "color"
Next create a new layer between the two others and paste in it the red channel switch blending mode to "screen" I think, than mask the layer and only select the water area in the front of the image, play around with the curve of that layer to make it look a bit more natural.
Than create a colour balance layer and in the mask select only the sky, play around until your happy merge all layers Adjust curve and saturation of the image like you want it.
Extend the canvas at the top of the image and draw a bit more sky and a cloud, than crop the image sharpen it, frame it and you'r done.
02 - clownfish (1)First one is a fairly straightforward image enhancement. Photoshop, masking out different areas of the image and applying levels, replacement colours, etc. Some use of the healing brush and a gradient on the sky.
03 - mickeymooHere is my quick and dirty go at doing something with the photo for the challenge, its not the best but lukily it will only be viewed at a small size!! It will certainly be interesting to see what everyone else comes up with.
OK details:
Adobe Photoshop CS3
1. process in RAW converter, adjusting exposure, fill light, blacks, cotrast, saturation, tone curve and CA.
2. open as tiff in photoshop
3. using magnetic lasso and magic wand select the sky and then adjust colour channels to get the pink sky.
4. using same as above select the blue areas of the water and apply a deep red filter
5. adjust curves
6. dodging and burning
7. remove noise
8. high pass sharpen
9. crop
10. resize to 800 px
11. convert to 8bit and save as jpeg
I think that was pretty much it.
04 - JohnwMy entry is attached, nothing too outrageous. I used UFRAW to do much of the post-processing. Being new at editing RAW images, and using unfamiliar tools, it wasn't a very scientific approach. I really just played around to get something that pleased me to look at, while trying to understand the software. Not that there was anything wrong with the original image in the first place. In fact in seems a bit like sacrilege to muck around with it. I simply tried to adjust some elements of the shot, such as seeing whether I could enhance the clarity of the water and submerged rocks in the tarn.
Anyway that's a bit long-winded, so here's what I did:
Open image in UFRAW:
1. Set to Auto adjust exposure
2. Set to Auto White Balance
3. Increase Colour Saturation to 1.5
4. Set clip highlights for positive EV to "soft film like"
5. Adjust exposure compensation in EV to 0.7
6. Set Output ICC profile to sRGB
7. Send the adjusted RAW image to the GIMP
In the GIMP:
1. Save as a JPEG file
2. Apply "Oilify" filter in the GIMP to simulate a subtle oil painting effect (Mask size = 8, Exponent Value =

3. Apply Canvas filter (Direction = Top Right, Depth = 2)
That's it.
05 - straight from camera as basic jpg, no editing06 - MJDJust had a quick play using Adobe Lightroom
Cropped
Exposure -.20
Fill light +10
Brightness -25
Contrast +30
Clarity +33
Tried playing around a lot more but had trouble with the sky and/or water surface looking flat or odd.
07 - photohikerI opened the NEF in Photomatix and tinkered with all the controls. (screencap below) Cropped in Photoshop, nothing else.
08 - tasadamIn RAW
basic - auto
tone curve
lights -18
darks -11
shadows +15
lens corrections -
zoom 400%
work on dead tree in sky on left and right vertical cliff of Paddys Nut on right.
fix red/cyan fringe -11
Straightening tool, zoom 100% and line most right dead branch on left side with its reflection.
Detail - Sharpening, up to 50
Fit in view
HSL/Grayscale
Saturation Oranges +30, Yellows +10
Luminance Blues -10, Oranges -10
Basic - Clarity +15, Vibrance +7, Brightness +44, Contrast +55
Exposure +0.7
Open image
Check image rotation correct by zooming 1600% and looking at cliff edge on right side of Paddys Nut.
Zoom 100%
Clone stamp tool, took out dust bunny from right side, took out many floaties from water that look like dust spots.
Tools - Sharpen - Unsharp Mask
Zoom 100% on white lichen on big rock in centre.
Adjust amount 130%, radius 0.3 pixels
Mode - 8 bit (darn it already was, it should have been in 16 bit for all that, I must have changed something).
File - save as JPG maximum resolution.
09 - StoogestI use Lightroom 2 for all pp except noise reduction for which I used Noise Ninja.
Techniques used include:
Adjustments to white balance (added a tad more warmth);
Used the 'recovery' tool to bring back some of the blue in the sky and mountain detail.
Upped the contrast to get a bit of 'pop' (I hate that term...)
Increased the clarity to get better definition, particularly in the background mountain.
Slightly adjusted the levels. In particular the 'highlights' were raised to make the snow brighter.
Added a tiny bit of vibrance to the whole image.
Upped the saturation of the green and red channels.
Slightly tweaked the blue channel up a tad.
Sharpened to 98%.
Auto noise reduction in NN.
10 - bluewombatI used UF Raw to handle the image initially, then exported it to GIMP. From there it through an "embossing" filter and finally I added a lighting effect called supernova.
11 - alliecatWell, here's my stab at post post-processing that photo of yours. Hopefully I haven't butchered it too much

It's been an interesting experience learning to use UFRaw and the GIMP. There's obviously a *lot* of scope there to produce a wide range of final results from the initial RAW data. Definitely something I'm going to have to look into more.
Anyway, here's the steps used to produce the attached jpg (I think! I may have forgotten something...)
In UFRaw:
- applied camera's white balance
- adjusted the level curve to try and bring out the most detail, especially in the snowy mountain bits
In the GIMP:
- applied the "contrast mask" technique from gimpguru.org to bring out the details in the contrasty areas
- applied a "GND" mask to darken the sky and bring out the clouds
- applied the sharpen tool (I tried the sharpen mask from gimpguru but it didn't look right to me...)
- cropped the image to the final composition
- increased the saturation slightly to bring out the colours more
After looking at different versions of the same image for so long it starts to become difficult to tell what looks "better". So I saved a bunch of different attempts, and came back to them after a few days and just tried to pick the one that looked "best", then I looked up my notes to see how I had produced that final image.
It was a fun challenge. I'll be really interested to see what others come up with.
12 - cameraposerI don't spend enough time on my own blooming photos, so I only gave it the quick and dirty.
Processing was done in CS3- mostly in raw.
Processing steps (best I can remember)
1) Cropped out some foreground to bring the most interesting part of the foreground into the focus of that part of the scene
2) Adjusted the following in RAW Converter
-Recovery +24
-Fill light +5
-Blacks +10
-Brightness +49 (a small adjustment down)
-Contrast +33
-Clarity +14
-Vibrance +14
-Saturation +8
Further tinkering in CS Raw Converter
-Highlights -3 (trying to give the sky some depth)
-Lights +13
-Darks 0
-Shadows -2
Sharpening in CS3 Raw Converter
-Amount 82
-Radius 0.8
Camera Calibration in CS3 Raw Converter
-Green Primary Hue +12
-Blue Saturation +31 (still trying to give some depth to the sky without it looking fake)
OPEN into CS3
-Adjust midtone contrast +5
13 - clownfish (2)Second one … well, I had a bit of fun. Photoshop again. What else is a graphic designer to do?